

If you ever used online shopping malls and got a request to leave a review for an item you bought, you would often run into the 5-star rating system. It's intuitive and easy to understand, we can easily presume what each score would mean without any clarification. I currently have been working on creating a shopping mall using PHP, HTML, CSS and some JavaScript and I decided to challenge myself to build an accessible UI for this one.
For this instance, I will use plain HTML, JavaScript and Bootstrap for CSS.
If you are not familiar with the bootstrap, check out this documentation!
If you have a good grasp of CSS, you would know what class would be the right choice for your work and it actually reduces a good amount of time as you would use the pre-configured CSS classes.
OK, Shall we start?
First off, I usually start with creating a HTML document.
You can see the example format down below with its finished work.

Easy peasy lemon squeezy!
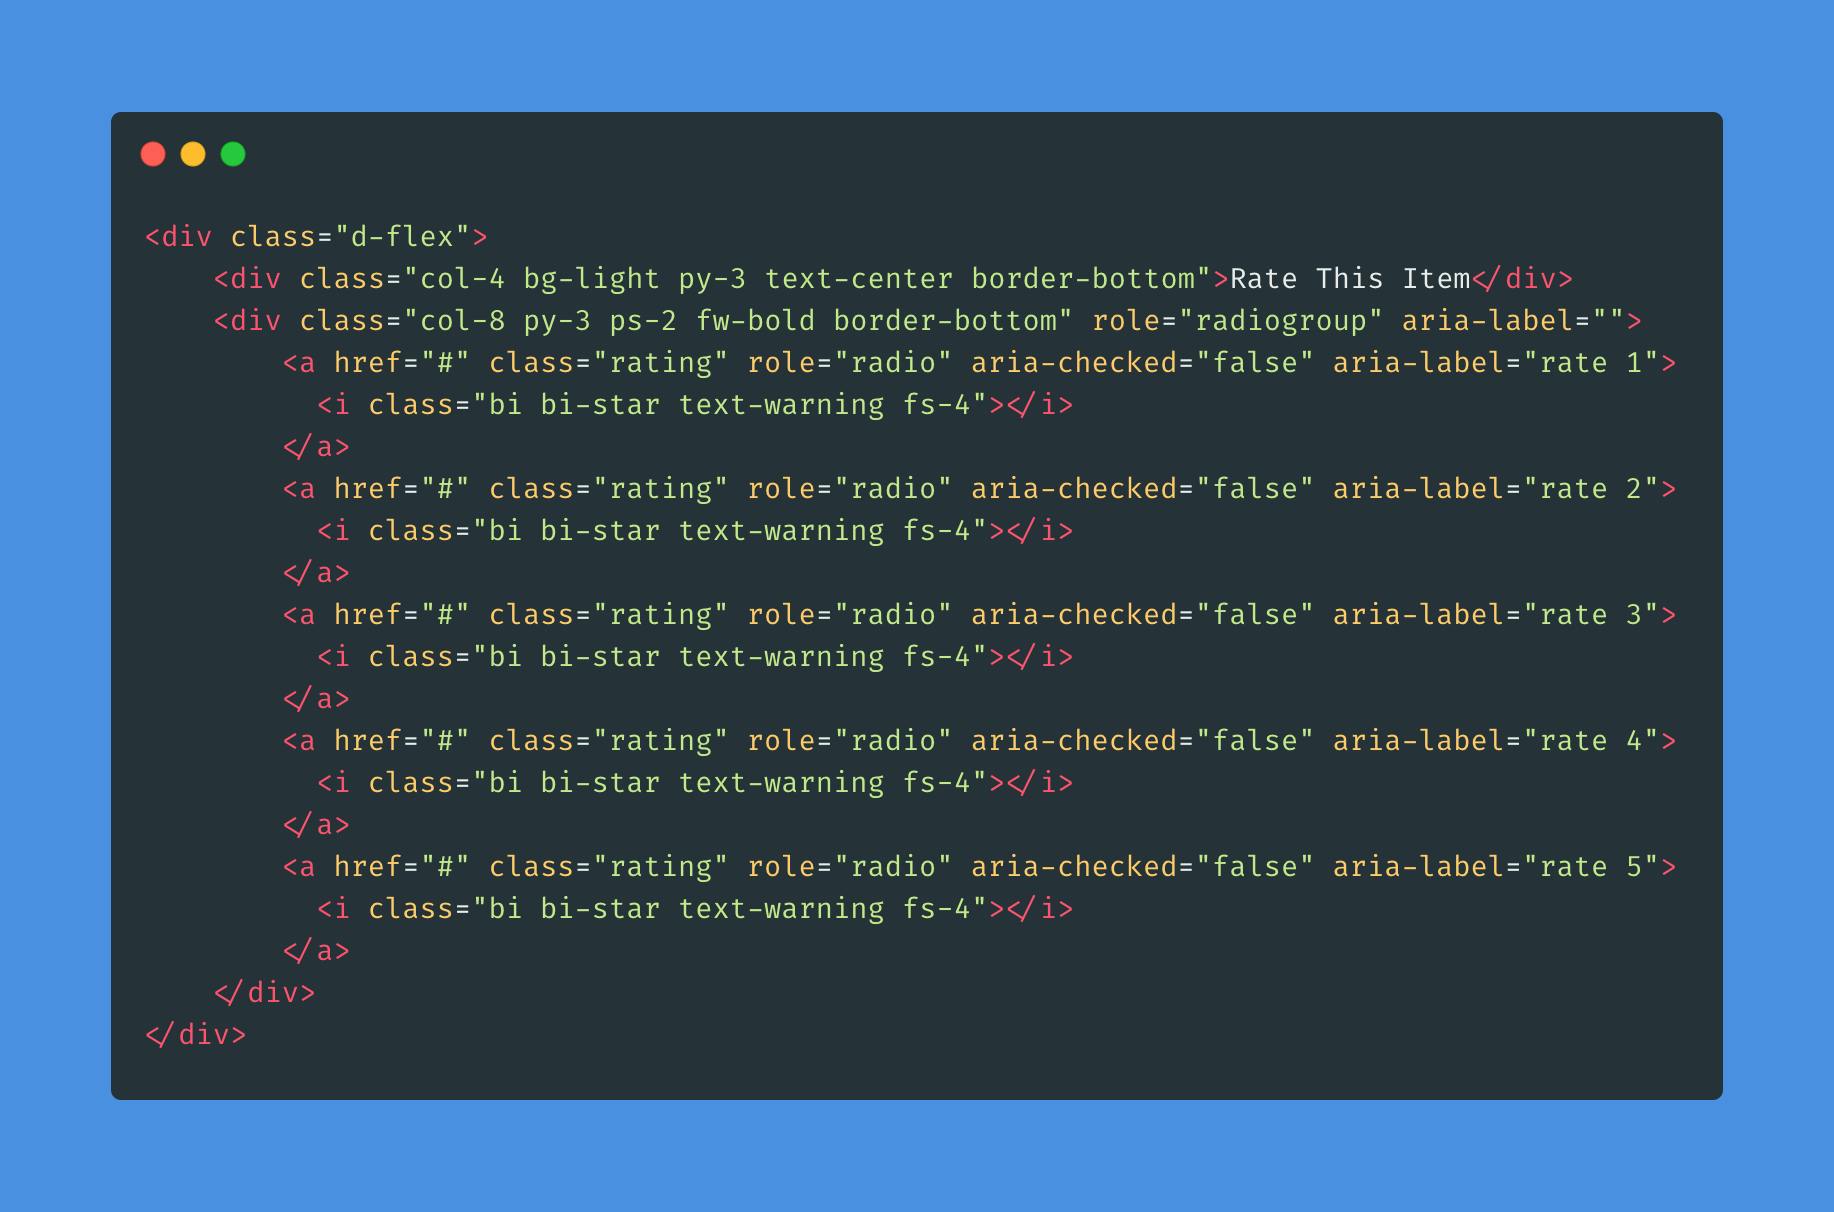
As I chose Bootstrap for CSS, I added all the classes according to their uses simultaneously as well. Since we aim to create an accessible user interface, I have included the WAI-ARIA attributes such as role, aria-label and aria-checked to provide improved semantics for the HTML document.
I mulled over for quite a while and I decided role="radiogroup" for the wrapper div which contains all the icons and anchors. Since all the anchors actually work like radio buttons which should tell a user whether each of them has been checked or unchecked, I have come to the conclusion that this would be the best solution for this case.
I left the aria-label value for the same div just empty as that would be dynamically added by JavaScript followed by a user's choice. And I defined role="radio" to each anchor. This would be helpful for users with disabilities as assistive devices would let them know what they are and users can presume what they need to do with them. Moreover, they become more semantic with those attributes as each anchor contains aria-label and its value accordingly. I have already tested with VoiceOver on Mac, each time I move around the anchors, it read out the value of aria-label and role. Great!!!
Finally we're moving onto JavaScript.
(function (win, doc){
    const rating = {
        init : function () {
            this.rating();
        },
        rating: function() {
            const stars = doc.querySelectorAll('.rating');
            const starArray = Array.from(stars);
            const role = doc.querySelector('div[role]');
            let totalRate = 0;

            stars.forEach((el, i) => {
                el.addEventListener('keypress', (e) => {
                    const { key, target } = e;
                    if (key === 'Enter') interaction(i);
                });

                el.addEventListener('click', (e) => {
                    e.preventDefault();
                    interaction(i);
                });
            });

        function interaction(i) {
            starArray.forEach((el, j) => {
                const star = el.firstElementChild;

                if (i === j) {
                    if (star.classList.contains('bi-star')){
                        star.classList.remove('bi-star');
                        star.classList.add('bi-star-fill');
                        star.parentElement.setAttribute('aria-checked', true);
                        totalRate++;
                    } else {
                        star.classList.remove('bi-star-fill');
                        star.classList.add('bi-star');
                        star.parentElement.setAttribute('aria-checked', false);
                        totalRate--;
                    }
                } else if (i > j){
                    if (star.classList.contains('bi-star')){
                        star.classList.remove('bi-star');
                        star.classList.add('bi-star-fill');
                        star.parentElement.setAttribute('aria-checked', true);
                        totalRate++;
                    }
                } else if (i < j){
                    if (star.classList.contains('bi-star-fill')) {
                        star.classList.remove('bi-star-fill');
                        star.classList.add('bi-star');
                        star.parentElement.setAttribute('aria-checked', false);
                        totalRate--;
                    }
                }
            });

            role.setAttribute('aria-label', `Your rating is ${totalRate}`);
        }
    }
}
    rating.init();
})(window, document);
If you are using a module bundler, you do not need to use the encapsulation and IIFE like my example. As I didn't use a module bundler, these techniques were implemented in order to avoid any global variable pollutions with other JavaScript snippets.
As you can see, there are two types of event listeners, the click event is for users who use a mouse/trackpad and the keypress event is for users who mainly use a keyboard.
I created all the variables on the top of the code block so, I can easily refer to them whenever I need them. We all know that what HTML elements need to be manipulated according to users' interaction. First, all the anchors would work like radio buttons here.
const stars = doc.querySelectorAll('.rating');
const starArray = Array.from(stars);
As the variable stars is a nodelist(not an array), I also converted it into an Array using the method Array.from(). If you are not sure why you need to do this, let me quickly summarise it for you.
document.querySelectorAll() is not a part of JavaScript API. It is a part of Browser(document) API which let us access to DOM elements. The thing is even if it contains list in its name, it is not an array, but, a collection of nodes. How confusing! If you want to manipulate DOM elements using Array methods, you should convert the nodelist into an array beforehand. One more thing! As you can see from my code snippet, the nodelist stars is iterated by forEach. Do not confound the NodeList.forEach() with the Array.forEach() method here! Actually, these are not JavaScript APIs, you can see them from other languages in order to interact with documents. I hope this clarifies your confusion.
The whole code snippet is basically to add an event listener for each anchor element and it runs the rest of the codes inside of the correct event type according to a user' input device. To reduce the repetition of the codes, I have wrapped the codes in the forEach method. If I didn't do it this way, I have to create the same event listener for each anchor element, that is to say, 5 times in total per event type! This way we can provide more readable codes for a team and we can work more efficiently.
To maximise the code reuse, I created a function called interaction.
Whether it is a mouse or keyboard interaction, fundamentally how they work is identical. I used the forEach method in order to iterate the same work over all the elements and the rest of the code is just to interchange the classes between bi-star and bi-star-fill based on the condition I wrote.
As I used ForEach twice, there are two index type, i and j.i index indicates the index of the anchor element which is clicked by a user amongst 5 of them and as j index is for the nested loop, the array indicated by j index will iterate every time a user clicks an anchor element. For example, the if( i === j ) statement is to enable the repeated interaction in case that a user clicks or keypresses multiple times on the same element, that is to say, aria-checked value can also switch between true and false interchangeably. Finally, each time a user interacts with the 5-star rating, the aria-label value will also change accordingly.
Based on the Google lighthouse report, there was no error detected and everything works smoothly without any error. However, if you noticed any improvable point of my work, please, do not hesitate to leave a reply and let's discuss! ;-) I hope you find this tutorial helpful for your work and if you enjoyed this, please leave a comment and like my post as well!
Cover Photo by Bonneval Sebastien on Unsplash